How to make a fillable form in Microsoft Word
What is the easiest way to create a fillable form?
You find yourself in a situation where you need to collect information for your business or personal life. You're contemplating using a Word document but sending one Word doc around is hard to version control and can be edited by multiple people. This would ultimately affect the accuracy of your data. So, you're left wondering how you can create a fillable form in Word. Forms like:
- Order forms
- Feedback forms
- Expense reimbursement forms
- Customer reviews
- Patient records
- Complaint forms
- Quizzes and assessments.
This article will guide you through the process of creating a fillable form, but before we delve into that, consider the option of using a form builder. With a form builder, you can sidestep various challenges, such as preventing text from wrapping within form fields, setting up visual cues for missing information, and storing data in a structured manner. It offers a responsive design for easy access via mobile devices and computers, among many other benefits. So, before you decide, let's explore your options and discover the best solution for your needs.
Check out this blog article if you’re looking to create a fillable PDF form.
How to create a fillable form in Word
Microsoft Word basic fillable forms are a practical way for you to collect information within a familiar Word environment, letting users edit answer fields but not your questions. You can have them emailed to you or sent to a database upon completion.
The process involves
- Opening Microsoft Word
- Enabling the developer tab for form field insertion
- Adding various form elements like text boxes, checkboxes, and radio buttons
- Customizing their properties such as labels and options
- Testing the form's functionality and
- Saving and distributing the document.
A step-by-step guide to creating a basic fillable form in Microsoft Word
1. Opening Microsoft Word and starting a new document.
Launch Microsoft Word: Open Microsoft Word on your computer. You can do this by clicking on the Word icon in your applications folder (Windows) or the dock (Mac), or by searching for "Microsoft Word" in the Start menu (Windows) or using Spotlight (Mac).
Start a new document: In Microsoft Word, go to the "File" tab at the top left corner of the window and click on "New" to create a new document. You can choose a blank document or select a template that closely matches your form's layout and design.
2. Adding form fields (text boxes, checkboxes, radio buttons).
Access developer tab
(Windows): If you don't see the "Developer" tab in the Word ribbon, you need to enable it. Go to "File" > "Options" > "Customize Ribbon." Check the "Developer" option and click "OK."
(Mac): You may not have a dedicated developer tab, but you can use the "Legacy Tools" option. Go to "Word" > "Preferences" > "Ribbon & Toolbar." Check the "Developer" option.
Add form fields: With the Developer tab enabled (or using Legacy Tools on Mac), you can now add form fields to your document. Click on the Developer tab and choose the type of form field you want to add, such as a text box, checkbox, or radio button. Click on your document where you want to insert the field.
3. Setting properties for each form field (label, options, default values).
Text boxes: For text boxes, you can right-click on the field and select "Properties." Set properties like the field's name, maximum length, placeholder text, and data type.
Checkboxes and radio buttons: For checkboxes and radio buttons, right-click on the field and choose "Properties." You can set a label for the field and define its options. For radio buttons, ensure they have the same name to create a group where only one option can be selected.
Repeat these steps for each form field you've added to your document.
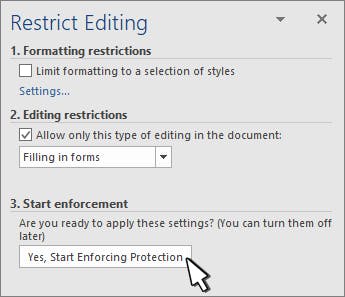
Restrict editing: Add an editing restriction to limit responders to only filling in the form fields (and not the questions or layout).
(WIndows): Under the Developer tab, go to “Restrict Editing” within the “Protect” category.
(Mac): Under the Review tab, click on the option that says “Protect Document” or “Protect Form.” In the dropdown menu that appears, click on “Restrict Editing.”
Then, in the panel that opens up, under “Editing restrictions,” check “Allow only this type of editing in the document.” In the dropdown list that appears, select “Filling in forms.” Then in the same panel, under “Start enforcement,” click on “Yes, Start Enforcing Protection.” You’ll be prompted to set a password protection. You can set a password or choose not to. Your restriction is set.
4. Testing the form within Word
Form mode -
(Windows): To test your form, go to the Developer tab and click "Design Mode." This will allow you to interact with the form fields. You can fill in text boxes, select checkboxes, and choose radio buttons to ensure they work as intended.
(Mac): There might not be a specific "Design Mode." Simply click on the form fields and interact with them to test their functionality.
Fill out the form: Test the form by filling it out as a user would. Make sure all form fields function correctly, and the labels and options are clear and intuitive.
5. Save and distribute your form
Once you’re satisfied with your fillable form, save your document. You can then distribute your form to the relevant people by email, as a download link on your website, or in-person.
6. Get responses
Export to Excel: You can export form responses to an Excel spreadsheet for easier data management and analysis by going to the "File" menu, selecting "Save As," and choosing an Excel format.
That's it! You've successfully created a basic fillable form in Microsoft Word, and you're ready to gather information from users.

The limitations of fillable forms
While fillable forms offer a convenient way to collect data, they come with certain limitations, particularly in terms of design options, mobile responsiveness, conditional logic and data validation. By understanding these limitations, you can make informed decisions when choosing the right form solution for your needs.
Design options
Fillable forms have limited design flexibility compared to web forms built on specialized platforms. While you can format and style form fields to some extent, you’re constrained by the software. This can result in less visually appealing forms that don't align with your branding or user experience expectations.
Lack of mobile responsiveness
Fillable forms are not inherently mobile-responsive. This means that when accessed on smaller screens like smartphones or tablets, the form may not display or function optimally. Users may need to zoom in, scroll excessively, or face usability issues, which can lead to a frustrating experience and reduced completion rates. A mobile friendly form, on the other hand, offers a much better user experience.
No conditional logic
A form with conditional logic allows fields to adapt dynamically based on a responder's previous answers, creating a personalized form experience. In fillable forms, each responder receives the same experience, even if certain questions are not relevant to them. This can result in a less user-friendly and efficient data collection process.
Multi step forms
Fillable forms in word can be a little overwhelming for the person who has to fill it in - we've all experienced that sense of dread when confronted with multiple pages of densely-packed questions. This is where multi-step forms come in. By breaking the form up into separate pages (that can save information as the user progresses), it's possible to improve the user experience, and increase completion rates.

Limited data validation
Fillable forms may lack data validation options. While you can set basic constraints like requiring certain fields to be filled out, more complex validation tasks, such as verifying email addresses or validating ZIP codes, may require additional scripting or external tools. There’s also no error handling so if a field is left blank, you can’t set up an error message to point to the issue.
No form update
As static documents, once fillable forms are distributed to users, any updates or corrections made to the form will not apply to the copies users have. In order to edit the form, you’d have to edit the original document, save and distribute it, and instruct users to use the new version.
Form Abandonment
Without features to track and recover users who abandon the form before completion, there's no way to follow up with these users. Potential leads or valuable data can be lost when users abandon a form. There's also a missed opportunity for engagement or conversion.
Limited Reporting and Analysis
Analyzing data collected from fillable forms can be less efficient compared to dedicated survey tools. You may need to manually extract and organize data from multiple documents, making it harder to generate real-time insights and reports.
It's important to consider these limitations when deciding whether to use fillable forms for data collection and to weigh them against the specific needs of your project or organization. Depending on your requirements, you might find that dedicated online form builders or survey platforms offer more advanced features and a better user experience.
Introducing form builders for enhanced user experience
Form builders enable users to craft intuitive and highly functional forms with ease. They offer an array of benefits that can streamline data collection processes and improve the overall user experience. The benefits of using a form builder to collect answers:
1. Mobile responsiveness for improved usability
About half of internet traffic comes from mobile devices, including people submitting forms. That’s why mobile-responsive design is such an important part of your form building process. Most form builder tools ensure that your forms adapt seamlessly to various screen sizes and account for touchpad vs touchscreen navigation. Mobile-friendliness enhances usability, making it convenient for users to complete forms on the go, whether it's for patient intake, appointment scheduling, or product purchasing.
2. Customizable branding
Maintaining a consistent brand is crucial for businesses. Form builders allow customization of form layouts, colors, fonts, and logos to align with the organization's branding guidelines. This not only enhances the visual appeal but also reinforces trust and recognition among users.
3. Conditional logic to show only relevant questions based on previous answers
Form builder tools offer conditional logic capabilities, enabling the display of questions based on respondents' previous responses. This tailored approach reduces confusion and streamlines the data collection process, ensuring that users are presented only with relevant inquiries. This is especially important in digital health, where you want to tailor form journeys to patients’ specific health conditions and needs.
4. Simplified responder journey with one or two questions at a time
Lengthy and overwhelming forms can discourage users from completing them. Form builders allow for the creation of multi-page forms or step-by-step workflows, presenting one or two questions. Many builders let you display progress indicators and interstitials that break up the form into sections. This progressive approach not only improves the responder experience but also increases form completion rates.
5. Data Security
Form builders offer substantial data security benefits, particularly where sensitive information such as patient data is involved. They typically use advanced encryption techniques to safeguard information during transmission and storage. They also enable seamless integration with secure databases and platforms, allowing for secure data handling throughout the submission process. Additionally, form builders frequently offer features tailored to specific regulations, such as HIPAA compliance, ensuring that data collection and storage practices adhere to legal requirements.
6. Reporting and analytics
If you’re planning to work with large sets of data and even to create a data-driven business model, form builders offer a significant advantage over fillable forms in terms of reporting and analytics capabilities. With most platforms, you can access real-time data insights, track form completion rates, and generate customized reports. They often provide advanced features like data visualization tools, which enable users to interpret and present data more effectively. Additionally, form builders may offer integrations with popular analytics and reporting tools, enhancing the depth and breadth of data analysis.
7. Enhanced overall visual appeal
Aesthetically pleasing forms are more likely to engage users and encourage completion. Form builders offer a wide range of design options, including attractive templates and layout customization. The result is visually appealing forms that make a positive impression on users.

Use Formsort to create interactive fillable forms
Formsort is a powerful form builder, especially for healthcare and fintech companies. Accounting for the unique needs and challenges faced by businesses in these sectors, the Formsort studio has been meticulously designed to streamline data collection, enhance user experiences, and promote efficiency in industries where precision, professionalism, and responsiveness are paramount.
For small businesses and those in need of simple form features, there are a range of tools available, such as Jotform and it's alternatives. None of these tools offer the same advanced functionality as Formsort, however!
The features that distinguish Formsort
Formsort offers a range of advanced form features:
1. Conditional logic for tailored questionnaires
One of Formsort's strongest features is its robust conditional logic capabilities. Intake, onboarding, and checkout forms often require dynamic questioning based on previous responses. Formsort's intuitive interface allows users to implement conditional logic effortlessly, ensuring that responders are presented with only relevant questions, thereby reducing confusion and improving data accuracy.
2. Mobile responsiveness for improved usability
Recognizing the growing trend of mobile device usage, Formsort ensures that all forms created are fully mobile-responsive. This means that customers, patients, and employees can effortlessly complete forms on their smartphones and tablets, anytime and anywhere, without compromising usability.
3. Customizable branding
Your forms should reflect your brand, not the form builder’s. Formsort understands the importance of precise branding in all digital products, including customizable form layouts, colors, fonts, and logos. This not only enhances the visual appeal of your forms but also reinforces trust and professionalism among clients.
4. Advanced data security and compliance
Security and compliance are important when handling patient data or customer financial information. Formsort takes data protection seriously by offering advanced encryption, access controls, and compliance with regulations such as HIPAA. This ensures that sensitive patient/client information remains confidential and secure throughout the data collection process.
5. Templates
Formsort offers a growing library of form templates designed to meet the specific needs of various industries. From patient intake and mortgage qualification to appointment scheduling and product recommendation, these templates make creating essential forms quick and easy.
Step-by-step guide to using Formsort to create online fillable forms
Below, we’ll show you how to design and publish your forms efficiently with Formsort. From signing up for an account and creating your form to implementing conditional logic, previewing, testing, and seamlessly integrating with Google Sheets for data collection, this guide covers all the essential steps. Let's dive in and get started.
Step-by-step guide
1. Signing up for a Formsort account
Sign up: Follow the registration process, which includes providing your email address, creating a password, and verifying your account.
2. Creating a new form
Studio: After logging in, you'll be taken to your Formsort studio.
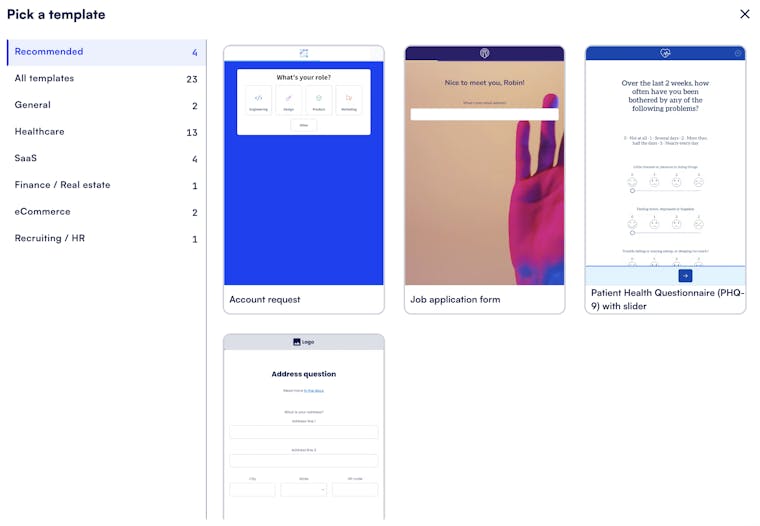
Click the “+ New flow” button and select “Pick a template” or “Start blank.”
- Template: Browse through the available templates and click on the template to start creating your form. You can edit the questions and answers and customize the design to your needs.
- New flow: Start by selecting a theme.
3. Customizing the form by adding questions, images, and branding
- Add questions and form elements relevant to your form. You can include text input fields, checkboxes for consent, dropdowns, and more.
If you select a template, you’ll see pre-populated steps. You can make any necessary adjustments.
- Add images and branding: Enhance the form's visual appeal and professionalism by adding images, logos, and custom branding. This step helps align the form with your healthcare company's identity.
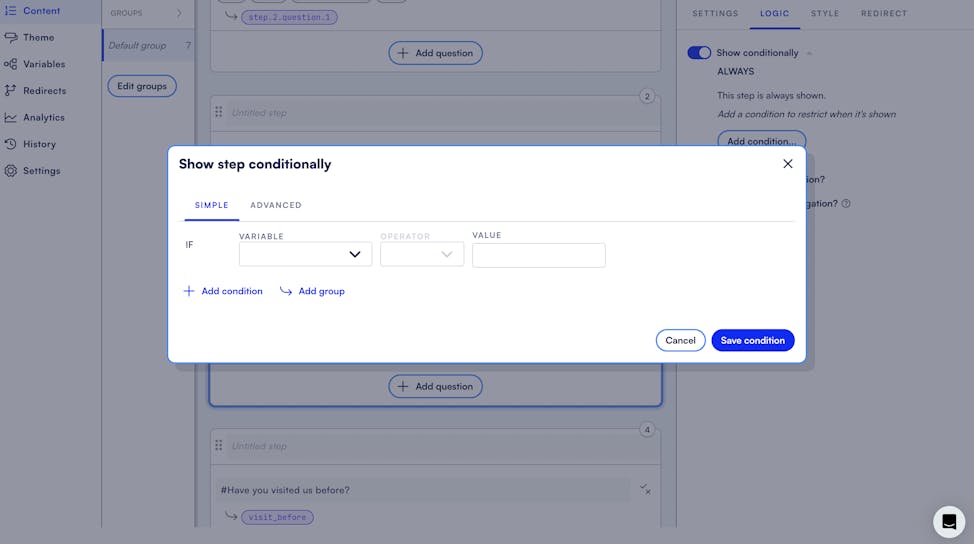
4. Implementing conditional logic for personalized user experiences
Conditional logic: To create personalized user experiences, implement conditional logic. For instance, set up rules that display specific questions based on the patient's previous responses. This ensures that the responder only sees questions relevant to their circumstances.
5. Previewing and testing the form
Preview: Before finalizing your form, use Formsort's preview feature to see how it will appear to respondents. This allows you to check for any formatting or layout issues.
Testing: Test the form by filling it out as if you were a patient or a user. Verify that conditional logic works as intended and that the user experience is smooth.
6. Connecting to Google Sheets to save answers
Google Sheets integration: To automatically save form responses, integrate your Formsort form with Google Sheets. This feature helps you maintain a central repository of data for analysis and record-keeping.
7. Publishing the form and collecting responses
- Publish the form: Once you're satisfied with your form, click the "Deploy" button. You'll receive a link or embed code that you can share with others.
- Collect responses: Responses are automatically collected and can be viewed in real-time within Google Sheets.
Get started with Formsort
As you make decisions on how to collect your data, you might consider Formsort as the form builder that will scale with you. Build your first form, customize, add advanced features, and manage data securely. Get the support you need every step of the way with Formsort.