Powerful Formsort form features you didn’t know about - Part 2

Content features to level up your next form
Are you a form building pro who’s looking to add some more tools to your kit? Or maybe you're curious about the potential benefits of a form-building solution like Formsort. Our articles describe many of the capabilities you can leverage to build powerful online forms. In this 2-part article, we’re trying to cover some of the lesser-known features that can help elevate your forms. Part 1 of our Hidden Formsort features article delves deep into design and responder behavior features.
Now, in part 2, we’ll highlight some of the content features that can help you streamline your form, improve data accuracy, and create personalized form journeys for your unique users. Content features we’ll focus on include:
- Exclusive select option
- Template formatting functions
- Age variable
- URL parameters / hidden fields
- Conditional redirects
- Disqualifying users based on criteria
- Showing the results of an API call
Exclusive select option
Automatically eliminate mutually exclusive choices and avoid errors
Let’s say you want to understand your responder’s symptoms. You’ve added a multi-select question on your form that asks patients to select all the symptoms they’ve experienced related to depression and anxiety. They can choose all the relevant symptoms or none of the above.
It doesn't really make sense to pick none of the above and any other choice at the same time, right? You'd probably want to use the exclusive select option here. What does it do? Once you enable this ‘exclusive’ toggle on for the "none of the above" choice, the rest of the choices would be disabled. This ensures that users don’t have to go back and manually deselect previously selected options. It also prevents bad data coming in as a result of conflicting answers being submitted. The exclusive selection option is great for multiple choice questions that can have more than one answer but one or more of the options is mutually exclusive of the others.

Exclusive select can also be used to prevent users from selecting conflicting options such as mutually exclusive symptoms or events with overlapping times. It simplifies the selection process in multi-select question fields if one or more of the options is incompatible with others. By automatically deselecting conflicting options, it minimizes user error and ensures that only one choice is recorded. You get valid data that lets you optimize your service delivery.
How to use the exclusive select option
To implement the exclusive select option for a multiple-choice question, create a select question. Then select Allow multiple selection in Settings.
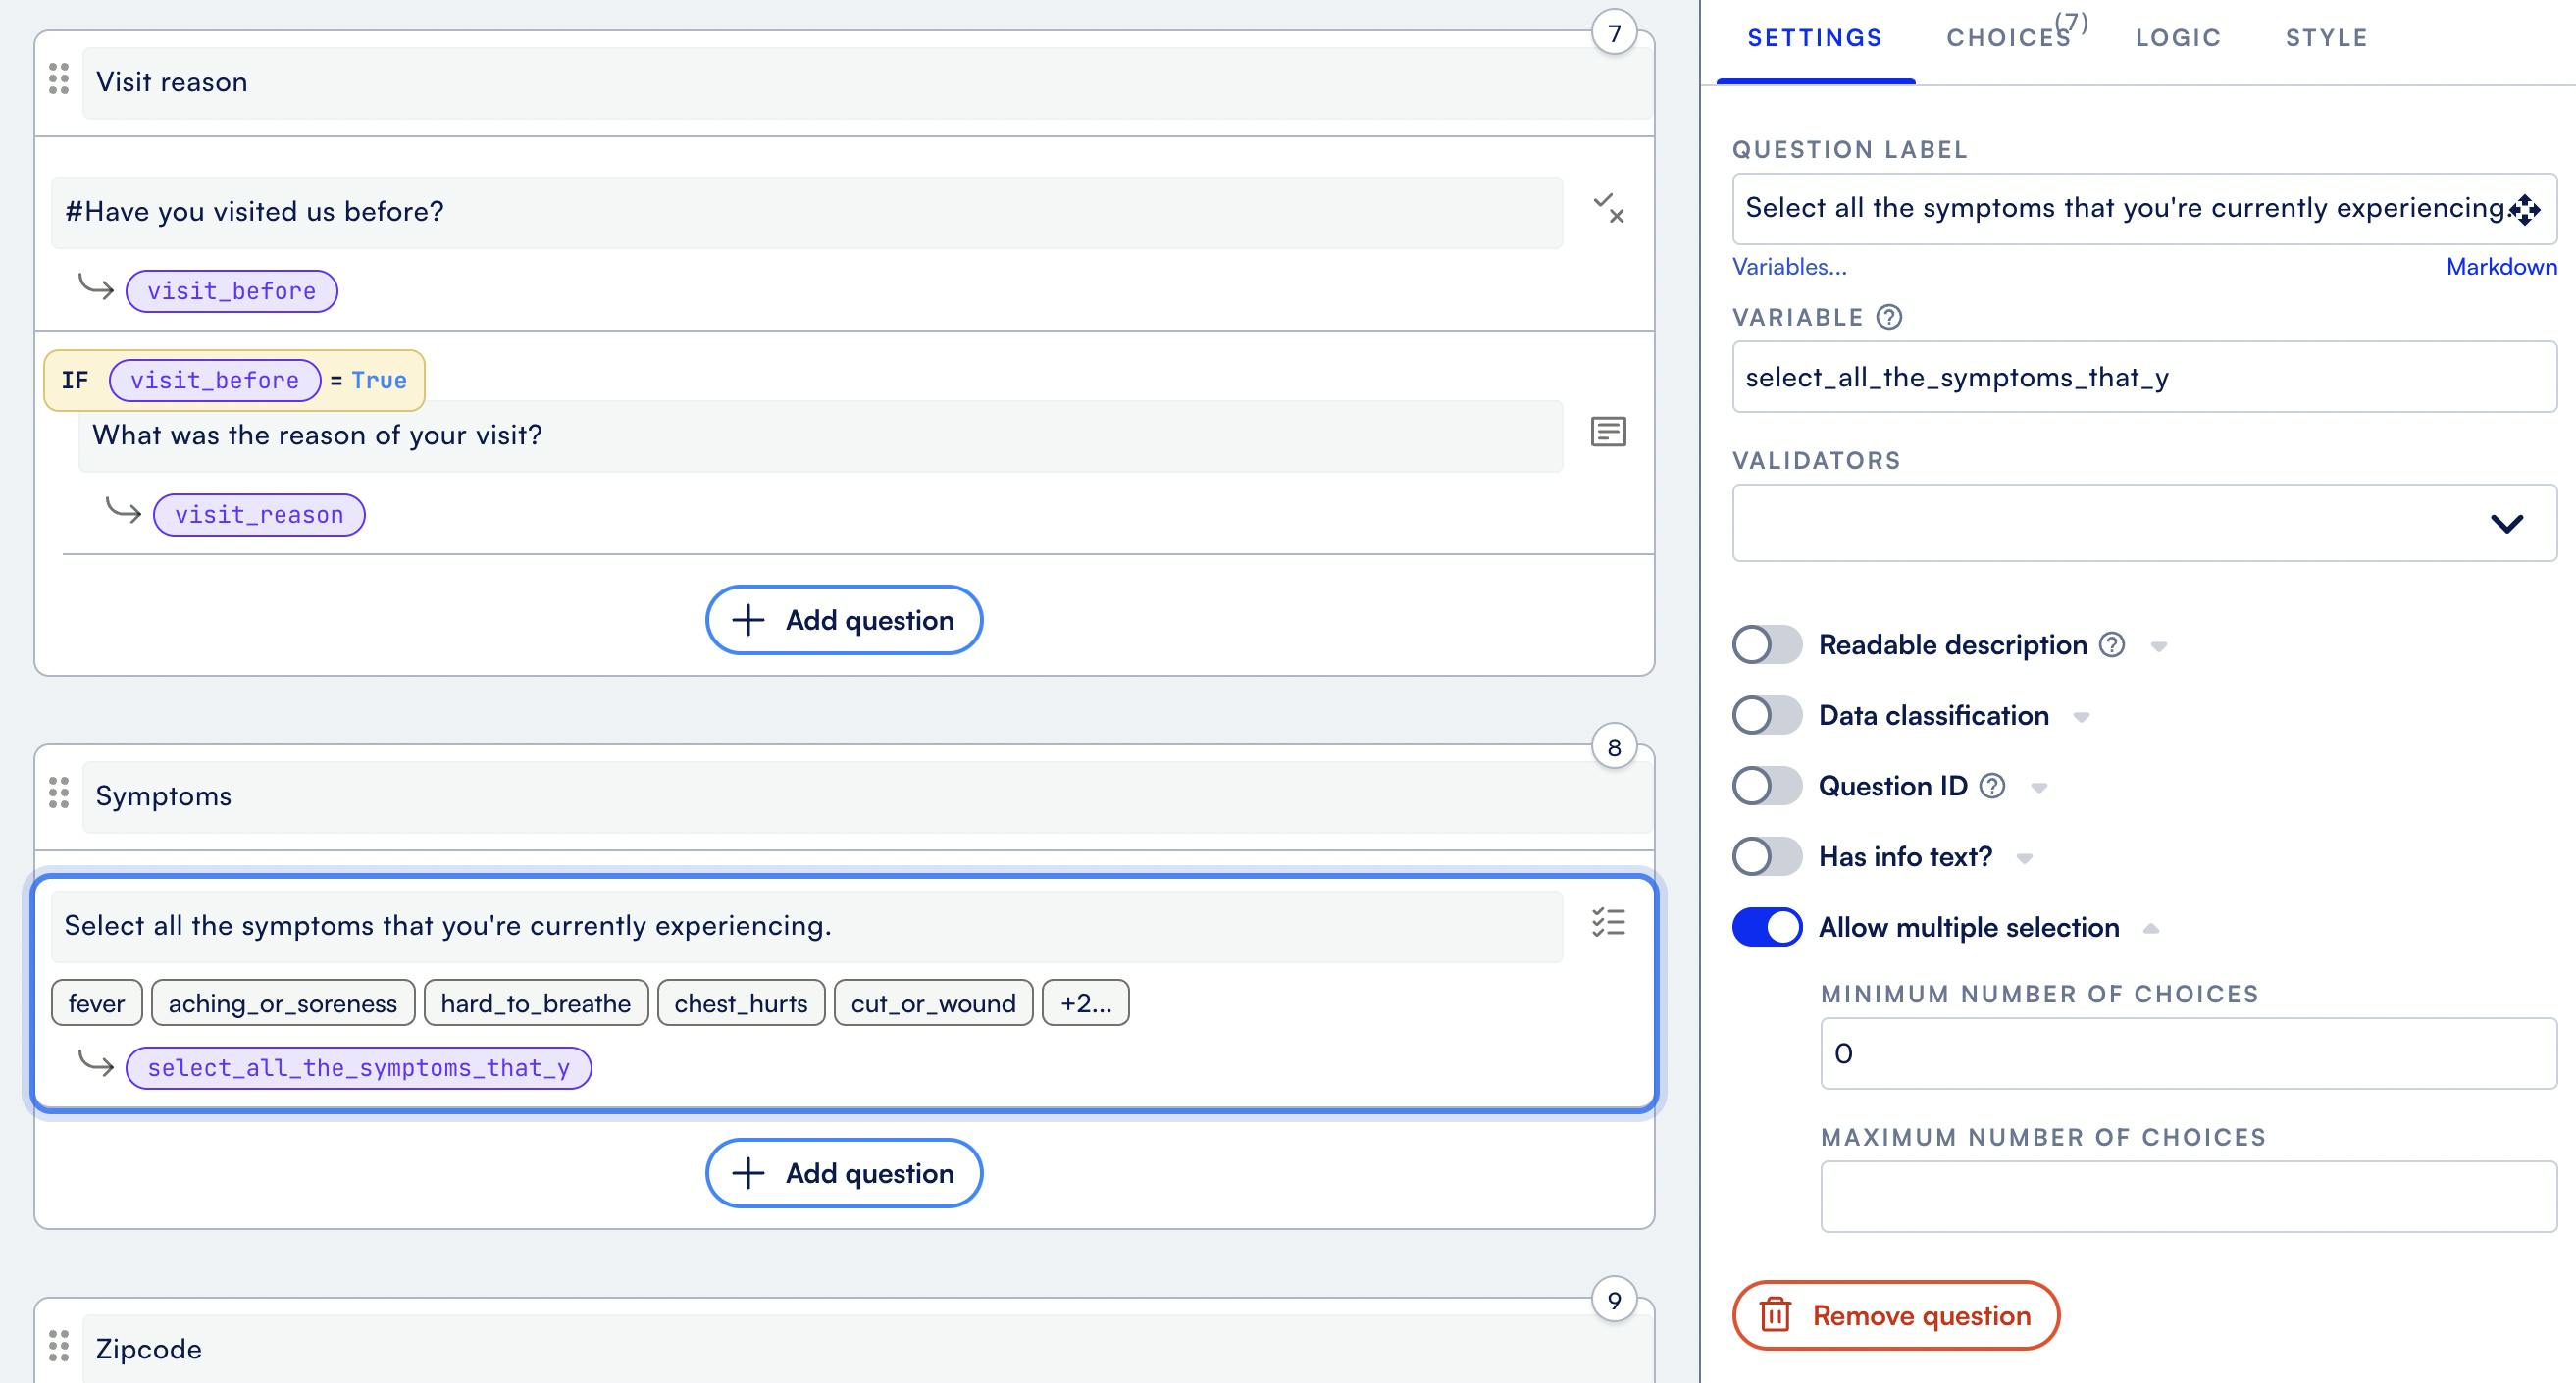
Then, in choices, select Exclusive for the choice(s), whose selection should deselect any previously selected choice(s). That’s it!

Template formatting functions
Enhance data presentation with built-in functions
You have a form in which you ask responders to enter their monthly rent. Now, since you’re based in the US, you’re expecting the value they enter to be in USD. But with people moving and traveling all over the world, you want to display a confirmation statement so the responder can check the accuracy of the information they entered. Template formatting functions are the perfect tool in this instance.
In the example below, a template formatting function accepts the rent value entered (as a number input) by the responder and dynamically populates it into a statement that uses a template formatting function.

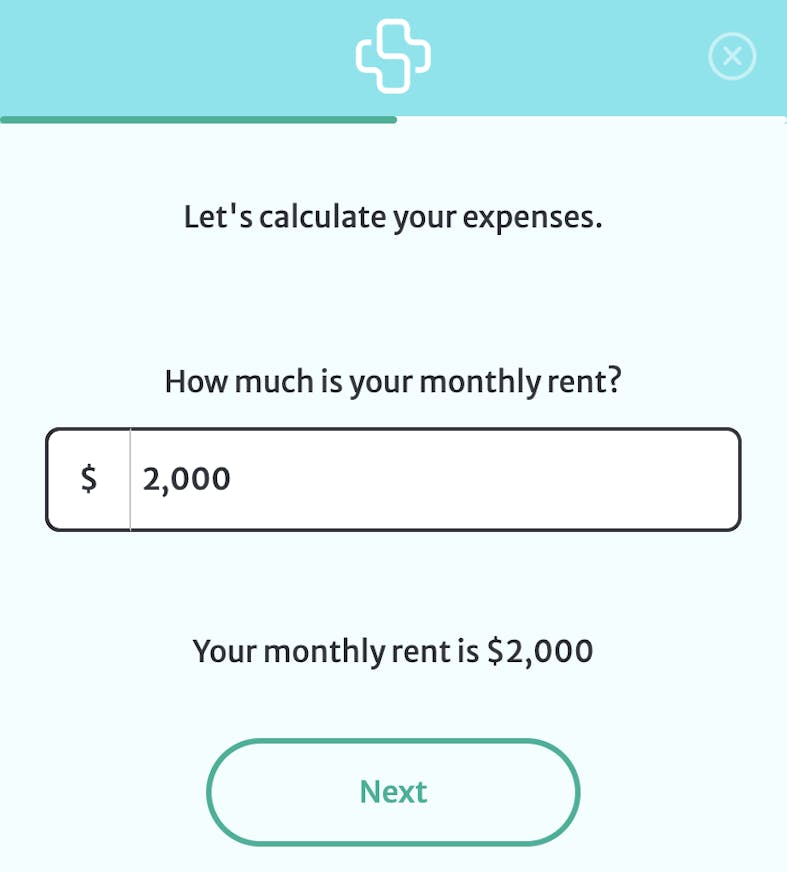
Even cooler–in a future form, you can pull this rent amount–stored as just an integer in a column in your database–and display it with the exact same currency symbol. You can say something like, “Our records indicate your monthly rent is $2000. Is this still accurate?”
A template formatting function lets you modify the way data is presented. These functions are typically used in situations where you want to insert dynamic content, such as user responses or data obtained through APIs, into predefined templates. By doing so, you can manipulate, format, and customize the appearance and structure of the data before it's displayed or used elsewhere. They’re a powerful way to ensure that the data you collect and display is accurate, well-organized, and visually appealing.
You can also use template formatting functions to:
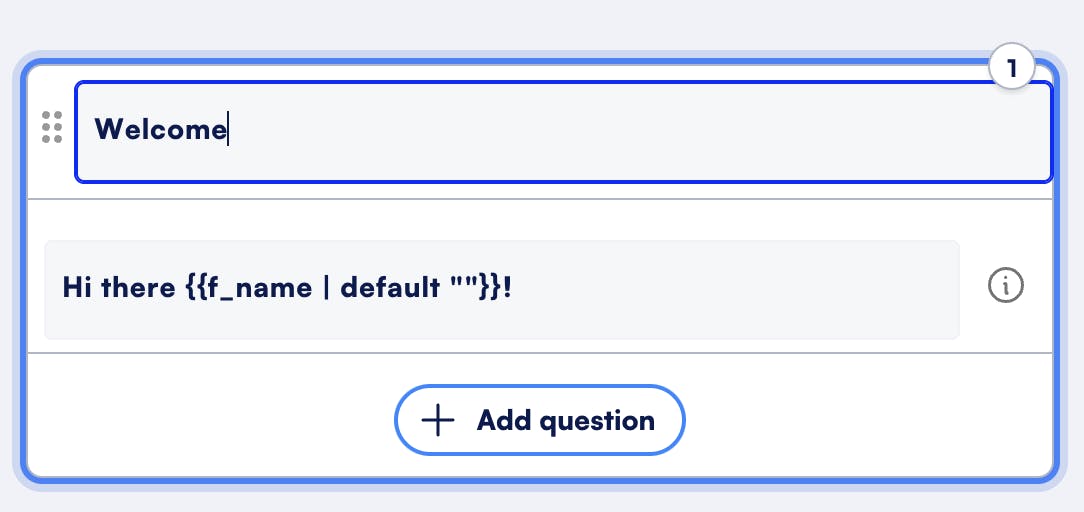
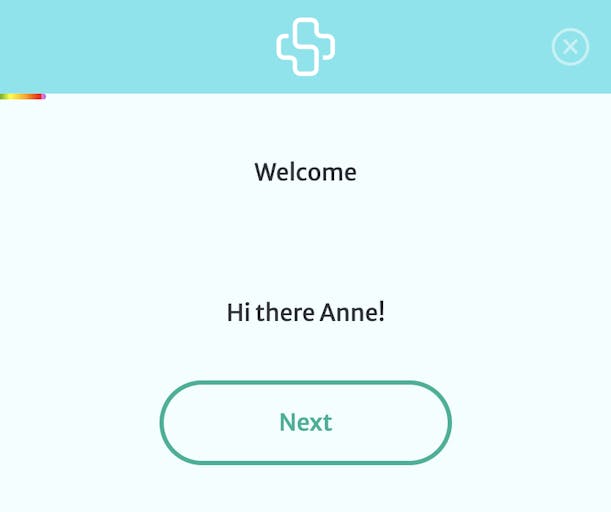
- Greet users: Start off your flow with a personalized welcome message. Use a template function to dynamically populate the user’s entered name into a friendly statement like, “Hi there {{first_name}}!”
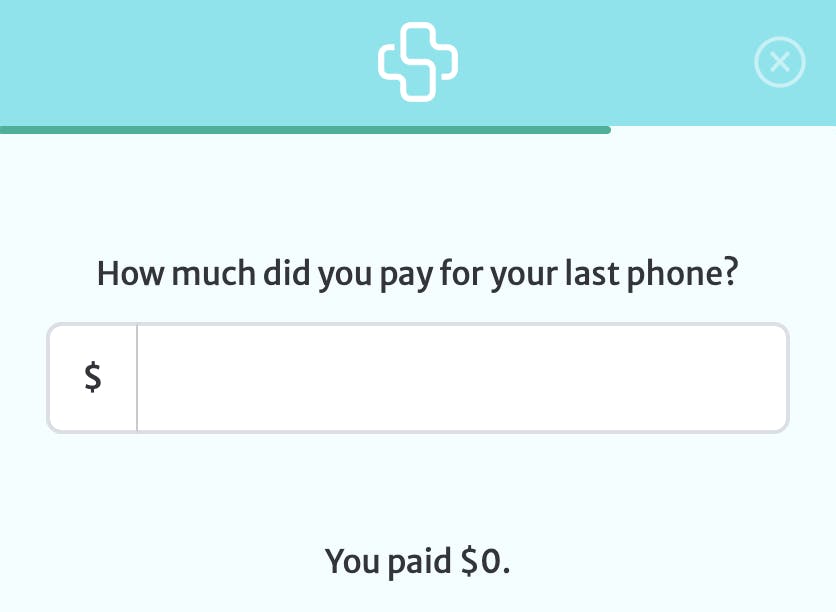
- Display a default value: The default value function lets you set a placeholder value for that field. This way, if left empty, the field won’t display code. On the backend, a default value will let you calculate averages, for example, without throwing errors. In the question you’d write: You paid {{cost | round | usd | default "$0"}}.
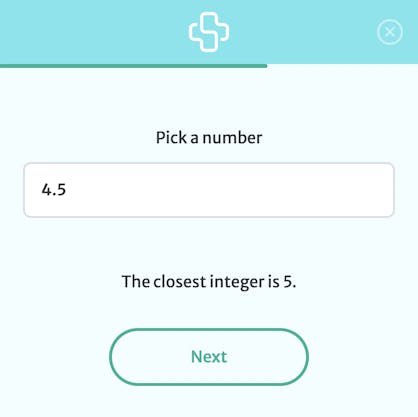
- Round a value: You can output an integer value for any real number with the following statement: The closest integer is {{number | round | default ""}}. Here, adding default “” will show a blank space, so until an input is entered you'll see “The closest integer is .”
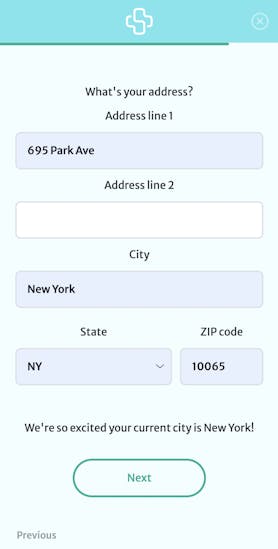
- Get a value from an array: You can extract any of the values a responder inputs with template formatting functions. For instance, if you ask for an address, this function will let you identify values from the array of values in the address array using the corresponding variable. The statement used in the example below is: We're so excited your current city is {{address | get "city" | default ""}}!
How to format answers for templated strings
To use template formatting functions, simply add one of the functions we mentioned above or in the docs to a question in the content area in the studio. Make sure the variable name matches whatever you put in the template.
Check out our docs for the full list of available template formatting functions.
Age variable
Automatically calculate responder age
If you need to calculate something based on an answer, you can use our calculated variables feature. Calculated variables create new values based on calculations of answers provided by users. You can create any kind of function to produce results like their BMI, the category of skin products they are best matched for, or what furniture pieces best fit their design aesthetic–all based on values assigned to the answer choices and a function that calculates the values.
One of the most useful variables you can use is the age variable. If you want to collect your patient’s date of birth and be able to calculate their age–to display visually on the form or for your records–it's redundant to ask both of these questions. Until now, you were able to insert a typescript calculated variable in Formsort to do this.
With the automated age calculator feature, you can now simply enable the date variable to automatically calculate responder age based on their date of birth. You can show the responder their age, or just send the data to your backend without needing any additional information from the responder. Automatic age calculation is efficient and prevents errors caused by responders manually entering their age.
Use cases and scenarios where the age variable is useful
The age variable can be extremely useful. You can implement it to qualify users or determine which products or services are appropriate for them, based on preset age requirements. You can conveniently use the age variable in conditional redirects, including:
- Age verification: Use age variables to verify that your users meet the minimum age requirement before granting access to certain medical or financial services. It helps maintain legal compliance and ensures responsible use.
- Healthcare forms: Age is a critical factor in healthcare forms so using the age variable can help you assess patient eligibility, needs, risks, and medical history accurately.
- User personalization: Age variables can be used to tailor the user experience. For instance, your e-commerce site can show age-appropriate product recommendations or discounts to users based on their age.
undefined
Setting up the age variable
When you create a date question select “Is date of birth?” in the right side setting panel.
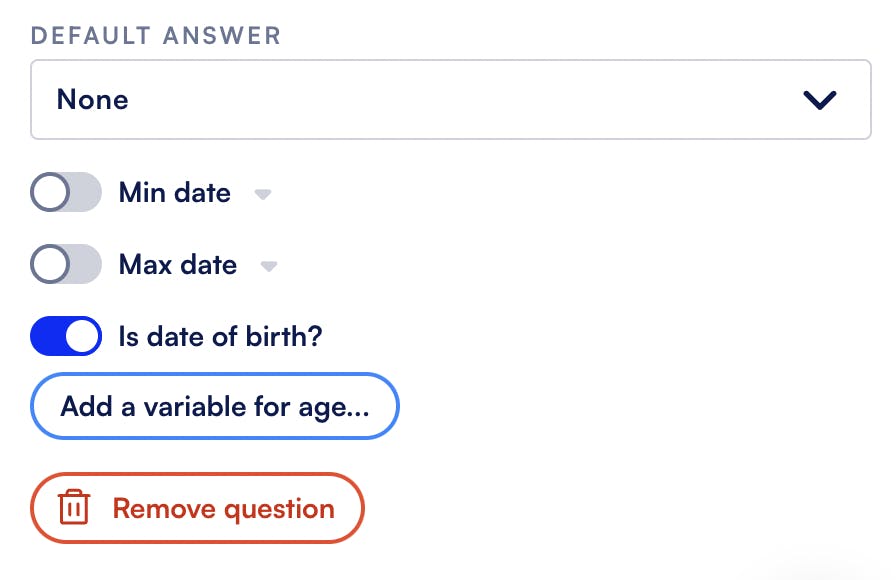
This will let you create an age variable. Click on the “Add a variable for age” button. Provide a name for the variable, eg “age.” You’ll see a ready-to-use function to calculate the responder’s age based on the date of birth they provide.
Hidden fields using URL parameters
Streamline form filling with URL parameters and hidden fields
There are certain cases where you already have some information about the responder and you want to pass that information into the form. URL parameters and hidden fields are like the unsung heroes of form management. They are powerful ways to store and pass data. This allows for a smoother and more streamlined user experience, as well as ensuring the accurate transmission of data. They take your forms to the next level of functionality and efficiency.
Let’s break it down:
URL parameters are nifty key-value pairs that you can tack onto the end of a URL, typically after a question mark, and separated by ampersands. For example, in the URL https://example.com?name=John&age=30, "name" and "age" are URL parameters with values "John" and "30," respectively. You can use them to effortlessly transmit specific data.
Hidden fields are elements within a form that store data but are not visible to the user. They are part of the form structure. You set their values through a bit of behind-the-scenes scripting. Hidden variables like user IDs, form identifiers, product IDs, and time stamps are indispensable tools.
When you can employ URL parameters & hidden fields
You can use URL parameters and hidden fields throughout your data collection and storage processes to create highly efficient, customer-first systems. Let’s look at some of the applications of these versatile tools.
- Pre-filling form data: Your users begin filling out a form, then life happens, and they need to come back to it. With hidden fields, you can work your magic. These handy tools allow you to pre-fill form fields with data that was already known from their previous interaction.
- Tracking and analytics: You're curious about where your users are coming from. With URL parameters, you identify which ads, emails, or campaigns led users to a particular form.
- Conditional logic: You can use hidden variables to set conditional logic that determines the flow or behavior of a form based on user input.
- Calculated values: Math can be fun, especially when your form does the heavy lifting. You can use hidden variables to calculate values, like adding up item prices in a shopping cart, and stash the result for later processing.
How to capture URL parameters and hidden fields using external variables
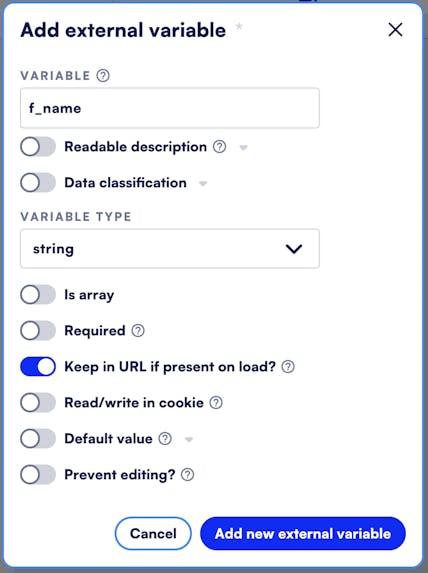
If you want to pass information into the form without asking the responder for answers, you can prefill data using external variables. Start by going to Variables > Externally provided and click +Add external variable. Give the variable a name and decide if you want to hit the toggle ‘Keep in URL if present on load?’ to keep the variables present in the URL. Then, make sure to include the same variable and a value in the url you’ll be sending to your responder. It will look like this - https://your-form.com/?f_name=Jane.
Let’s say you already have the patient's first name and you want to display it on a page. You can do so with an external variable by catching the value from the url. In your question field, you can retrieve their first name using that variable.
Conditional redirects
Personalize form paths with conditional redirects
Conditional redirects is a feature that enables you to precisely control the path responders take after submitting a form. It allows you to set conditions that determine where users are redirected based on their responses. You can define conditions for each redirect, and redirects set without conditions will finalize the flow.
When and how to set conditions for redirects
Conditional redirects are a great tool to customize your users’ journeys within your forms. Some of the ways you can leverage this feature include:
- Product and service provider recommendations: After obtaining necessary user data, you can redirect them to product pages tailored to their specific needs and preferences. Food52, for example, redirects to different gift ideas based on responders’ preferences.


- Customized flow sequence: Streamline intake by using responses on a general introductory form to determine which form to direct patients to after the initial form.
- Onboarding: Depending on responses, you can route users to different areas of your business so they can be matched to the right service team. In healthcare, you can direct patients to scheduling options with the best-fit service provider.
- Thank you pages: You can redirect users to personalized "thank you" pages or messages based on their selections. For instance, thanking customers for specific product purchases or event registrations.
- Geographic routing: Redirect users to region-specific content or services based on their location data.
Setting up conditional redirects is pretty straightforward inside the Formsort platform. First, for your final question, click on the step, and then open the redirect tab at the top right of the page and click +Add redirect.
When you see the URL field, click on the waffle next to the text. Switch on Redirect conditionally option. You’ll see a pop-up to add the conditional specifications. You can add the condition that will determine the redirect and click Save condition.
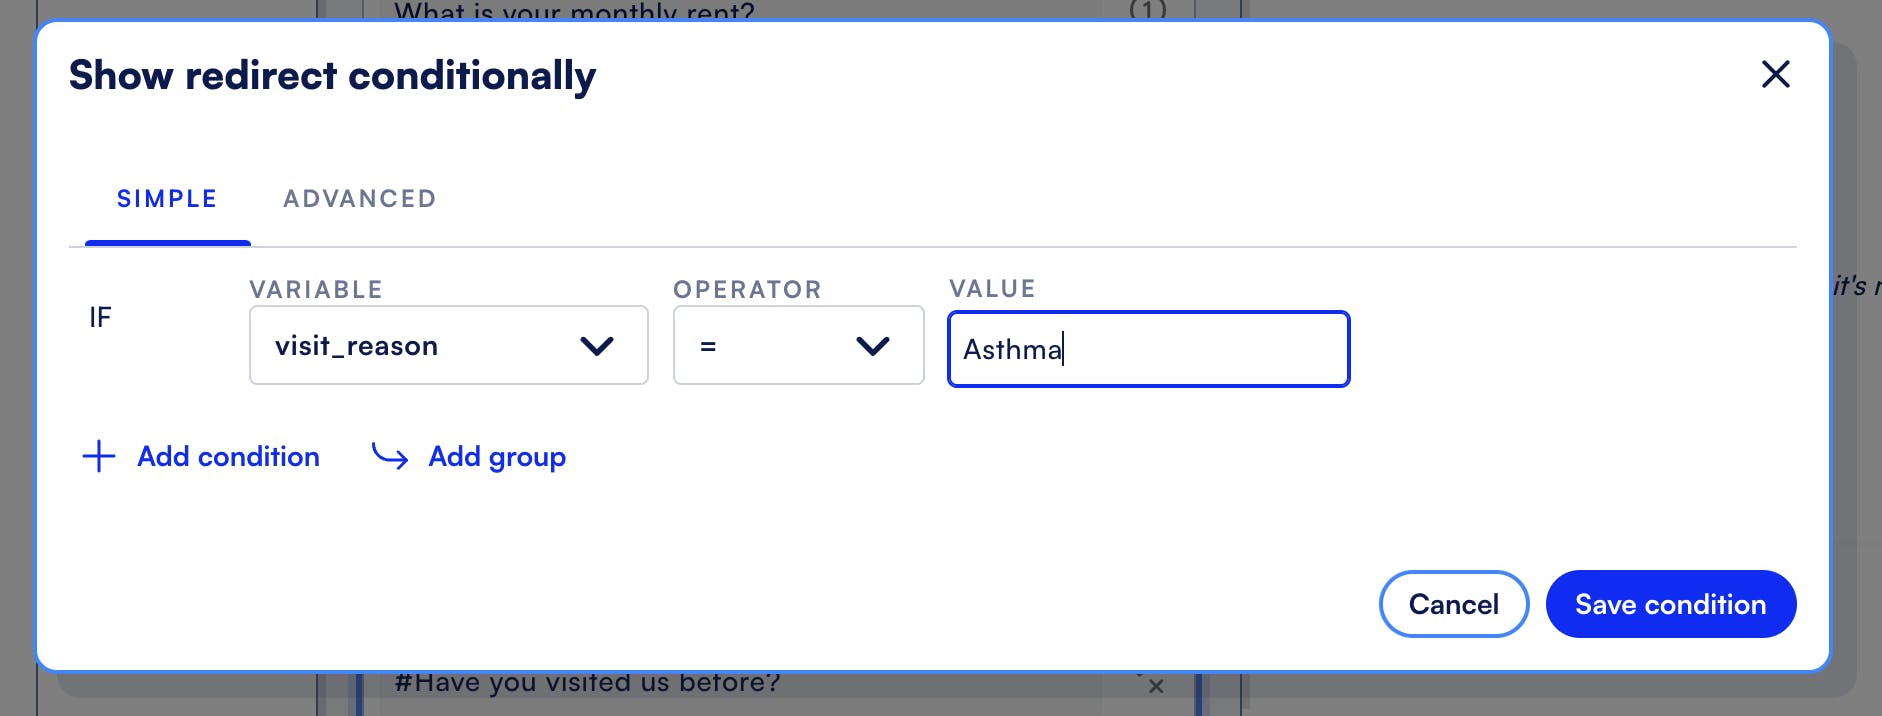
Finally, add the URL to which the user will be redirected if the condition is met. In this example, an asthma patient at Awesome Health will be redirected to an asthma and respiratory health-specific intake form to further determine their needs and match them with a provider. This redirect can be opened in a new tab if you enable that option. You can add multiple redirects here, each with its own condition(s).
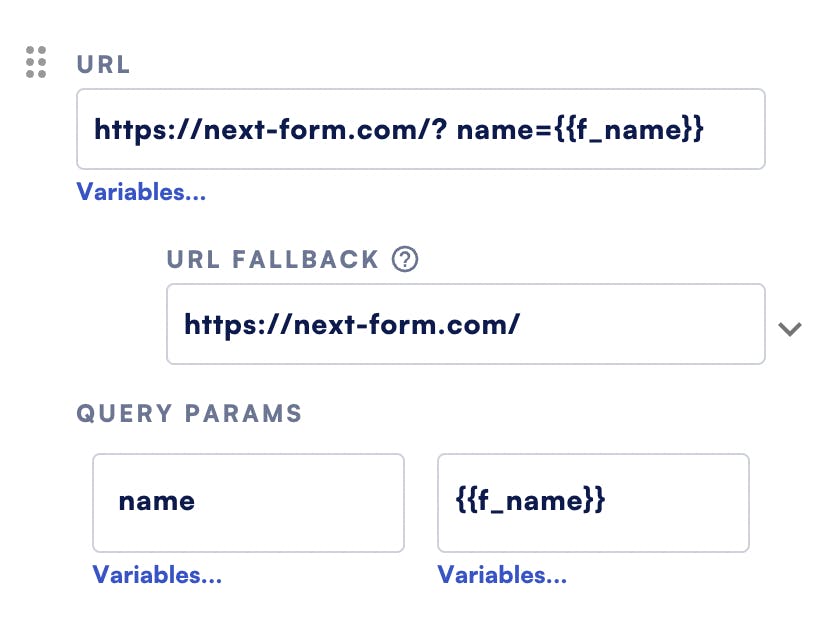
Bonus: template parameters into the redirect URL
Template parameters are variables that are dynamically replaced with specific values when the URL is generated and used. If you’re redirecting users to another form, you already have some of their info. You can transfer relevant data to the new form similar to how you would with the external variables.
To leverage template parameters, go to your form’s Redirect tab and click +Add redirect. Let’s say you want to pre-fill the user’s name based on their first form. Type in the URL of the form to be filled next and add a query parameter by creating a parameter key (‘name’ in the example below) and the variable (‘{{f_name}}’ in this case) that will be dynamically replaced by the actual value. Make sure to add a fallback URL in case there’s any issue with the parameter redirect.
Disqualifying users based on criteria
Streamline your eligibility process criteria-based lead qualification
Not every responder is a perfect fit for every product or service. You don’t want to onboard a boy with a sprained ankle at your prenatal health center. The criteria-based disqualification feature lets you establish conditions that, when not met by a responder, result in their disqualification from continuing with the onboarding process.
Using the criteria-based disqualification feature will help you identify and prioritize the right leads. It streamlines your enrollment process and saves ineligible responders from spending unnecessary time on a full onboarding form for products or services that aren’t relevant to them.
Examples of when and why this feature is useful
Criteria-based disqualification is a versatile tool you can use in various applications. Some highly effective ways to leverage it include:
- Disqualify patients based on state or medical condition: In healthcare forms and patient assessments, it's often necessary to disqualify patients based on their state of residence since services may not be available in all states, especially if the services are not offered online. Marley Medical’s qualification form is quick and easy, moving forward only eligible patients.
Many healthcare businesses are also specialized in specific medical conditions so it’s important to identify the right patients. For instance, a medical trial might target patients with a particular ailment, disqualifying those who don't meet the required criteria. - Age-based filter: Age restrictions are common in many scenarios, such as medical programs, age-restricted content, event attendance, and consent forms. Criteria-based disqualification lets you restrict access or participation to individuals within a specific age range, ensuring legal compliance and user safety.
- Targeted surveys: In market research and customer feedback surveys, disqualifying users who fall outside those groups is essential to maintain data accuracy. For instance, if you are conducting a survey about customer preferences for a particular product, disqualifying users who haven't purchased that product ensures that your data is relevant to your target audience.
- Efficiency and resource allocation: When limited resources are available for follow-up or further engagement, disqualifying responders who do not meet specific criteria helps allocate resources more efficiently. For example, if you have a B2B product, disqualifying non-commercial leads is essential to a streamlined sales funnel.
How to disqualify responders
Disqualifying users can be quick and painless, which is efficient for you and appreciated by users. First, identify your qualification criteria, whether it’s filtering in responders from certain states or filtering out anyone under 18. Add the question(s) that will let you programmatically determine eligibility. For example, if you ask responders for their date of birth, you can calculate their age with the age variable and built-in calculation feature.
If you obtain their email, you can use it to reach out in the future when they might qualify. Using conditional logic, you can create two possible routes for the user, one that continues the rest of the onboarding process and one that informs the user they don’t qualify. You can add any resources that might help them. You can find out more details about this process here.
Showing the results of an API request
Display API call results in forms
Implementing the capabilities of an API can take your online forms to the next level. One feature that exemplifies this is the ability to display API call results within your forms. For example, you can display a list of all your store branches in an area based on the user’s zip code. Or show the prices of relevant products in your inventory.
- Real-time data: By integrating API call results, you can present real-time data to form responders. This could be anything from stock prices, weather forecasts, currency exchange rates, or product availability, making your forms not just static questionnaires but dynamic and information-rich experiences that are always up-to-date.
- Personalization: Displaying API call results allows for a high level of personalization. You can tailor the content based on user preferences, location, or specific criteria, making the form experience more meaningful for each responder. This leads to a higher level of user engagement.
- Efficiency: Users can make decisions, provide responses, or take actions directly within the form without the need to navigate to external websites or applications to gather information. This streamlines the process and keeps users focused. Your form completion rates are higher and your data is reliable.
How to show the results of an API call
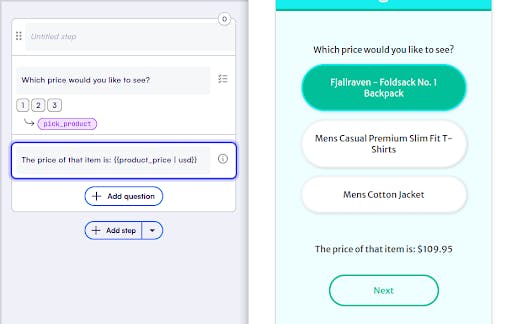
In the example below, we’ll have our Fake Store API return the price of a product that the user chooses.
First, we’ll need to set up a question to capture the answer that we can feed to our API, to get our targeted response. We’ll call this question pick_product.
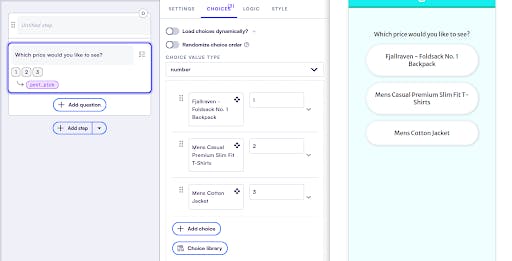
Notice that the Select question pick_product returns a number that correlates to a specific product. We can plug this number into the URL path of our API to get the price of a specific item. We’ll use variable templating to make this dynamic!
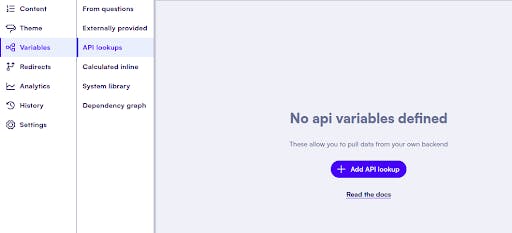
Head to Variables > API lookups and choose +Add API variable.
In the API variable editor, enter a variable name, and the URL to the API. Template the variable pick_product into the URL path.
Set the variable type as well - this is the data type of the API return. We are asking for a price, and we should expect a number to be returned.
If your API returns an object, you can use a mapping() function or the JSON Accessor to parse the response. In our case an object will be returned with various information about the product - we only want the price field.
We’ll use the JSON Accessor to pull the price out:
Now that we have successfully set up and tested our API call, we can template the return into our form to show our user the price. You can even use a template formatting function to make sure it is presented in US dollars!
Power up your next form with Formsort
Whether you're aiming to boost user engagement, streamline your customer feedback process, or simplify data collection, Formsort has a feature that's tailor-made to make your life easier. From conditional logic that tailors the user experience to dynamic content that keeps your forms fresh, there's a solution for every form-building challenge.
Forms can be powerful tools if you know your way around them. Make your forms work hard for you by enabling Formsort’s advanced features. Dive into Formsort's range of features as you build. See what all the buzz is about at Formsort and create your next form with superior capabilities.